Monday, June 27, 2011
Saturday, June 25, 2011
Parchment craft
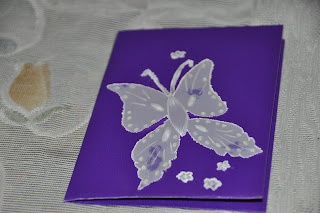
Hi freinds !!! Due to ill health hv not been blogging lately. Its too hot in Delhi and the heat is getting unbearable day by day. Hope it will rain sooooooooooooooon which will sooth our burnt & tanned skins.Now back to what this blog is originally meant for i.e craft. These two cards that u see above, r in parchment. I got these designs from net.
Hope u like them. Do comment on my work. Its actually encouraging and motivating.
Thanks for visiting my blog.
Friday, June 17, 2011
Candles
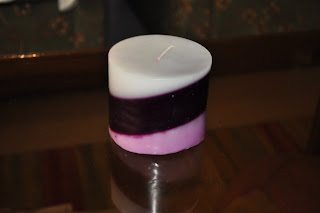
This is Tilted candle which one of my student made. Actually we wanted to hv three layers- white, purple & white. But in the last layer when we poured white, i think the temp. of the wax must be a bit high & the colour got mixed, resulting in a light purple shade. But still the candle has come out beautifully. To make this u need to keep ur candle mold in a slightly tilted form, so that u get slanted layers.
This one is Chunk candle I had left over wax of different colours of which i made cubes. U can make them by using ice trays. Just wick ur mold, put these chunks and pour wax on it. I hv used hurricane wax, and since this is transparent wax, one can see the different coloured chunks embedded in the candle.
I hope u like these candles and try out yourself.
Thanks for visiting my blog.
HAVE A HAPPY & SAFE WEEKEND.!!!!!!!!!!!!!!!!!!!!!!!!!!!
Sunday, June 12, 2011
Lamasa Tissue stand
Hi!! The inspiration of this tissue stand comes from my baudi's place whom i was visiting last weekend. The actual tissue stand was a ceramic one and i liked the design so cute that i decided to replicate it with lamasa clay. So here it is. The size i believe has come out to be a bit smaller but otherwise it is looking really cute with fruits hung on the kettle. The other side of the stand ( not visible) is similar. Can be used when u r having kid's party. Hope u people out there viewing my blog like it tooooooooooooooooooo. Thanks for visiting my blog. G.night.
Thursday, June 9, 2011
LAMASA WIND CHIME
MOBILE TUTORIAL (PART - II)
Hi folks !!!!! Sorry fr having taken so much of time to come back with the remaining portion of the mobile tutorial. Honestly with kids summer vacation going on it does become a little bit tedious to complete this project. Anyways as i told u in my previous posting that u will hv to make lots of beads, bells any other things u would like to add. It depends entirely on ur choice. For mine i hv added elephant,tortoise,hut and bells. Air dry them for a day or two. Remember to make holes in them while molding so that u can pass them thru thread.Apply varnish on these pieces, Let it dry.Then adjust these beads,bells,characters in whichever order u would like and attach them with glue gun as shown in the photograph. Mine has five threads and its only in the centre thread that i hv attached all the characters. Mind u this is going to take some time
Congratulations !!!!!!!!!! Ur mobile is ready to be hanged !!!!!!
Saturday, June 4, 2011
Thursday, June 2, 2011
Parchment craft
I hv recently learnt parchment craft and this is my first project that i hv done independently. This craft is very delicate and exquisite and can be used for making cards, small pouches,bags,envelopes,photo frames etc. The more u explore i believe one can create beautiful designs out of it.
METHOD
a. First u need to trace the design on parchment paper.
b. Outline the design with parchment ink & mapping pen. Since my tool is not working properly i hv used black fine liner to trace the design.
c. Now depending on the design u can use different parchment crayons to colour it. This is also called dorsing.
d. After this step u need to emboss with the embossing tool. This will give the protruding effect.
Note : After tracing, all the steps mentioned thereafter needs to done on the reverse side of the parchment sheet.
MATERIAL FOR THE PARCHMENT CRAFT IS AVAILABLE ON SHILPI.COM
Subscribe to:
Comments (Atom)


